How to Review Pictures on Nikon Without Activating Lens
![]()
![]()
Intermediate
Picture Controls Pace-by-Footstep
Utilize Picture Controls in-camera or during post-processing to modify the await of your images
The Nikon Picture Control system features a variety of Picture Command options: Standard, Neutral, Brilliant, Monochrome, Portrait*, Landscape* and Flat*. Using them allows you to adjust for a diverseness of parameters. Standard, Neutral, Brilliant, Portrait and Landscape allow for adjustments to clarity, sharpening, contrast, brightness, saturation, and hue (coloration). Monochrome allows for adjustments to sharpening, contrast, brightness, filter effects and toning. (* Bachelor for specific Nikon DSLRs.)
Motion picture Controls are found in the Shooting Bill of fare. Set Picture Control lets you choose from Standard, Neutral, Bright or Monochrome. Manage Picture Command is used for managing custom Film Control settings.
Picture show Controls are found in the Shooting Card. Set Film Control lets you cull from Standard, Neutral, Vivid or Monochrome. Manage Moving picture Control is used for managing custom Picture Control settings.
Many photographers think of Picture show Controls as the way to personalize their digital images like they did in the film days by using dissimilar film emulsions when they were looking for a specific expect that one motion-picture show offered over another.
Picture Controls can be found in many Nikon digital cameras, including DSLRs, the Nikon 1 interchangeable lens cameras and COOLPIX indicate and shoot models.
Under the Shooting menu, highlight Select Film Control to change the Picture Control. To create custom Flick Command settings, or to install optional Picture Controls, highlight Manage Picture Control.
Standard
Suitable for portraits, snapshots, landscapes and just about whatever other type of photograph, the Standard Picture Command gives you lot standard, balanced images. With Standard, yous can arrange sharpening, contrast, brightness, saturation, and hue (coloration) individually. Quick Adjust enables piece of cake, balanced adjustment.
Neutral
Delivers images that are closest to the original scene. To reproduce the discipline's unique colors and gradations with maximum authenticity, avoid extreme enhancements. Compared to Standard, Neutral gives a more soothing overall impression. With Neutral, you can adjust sharpening, contrast, brightness, saturation, and hue (coloration) individually.
Bright
For distinct, colorful, fresh-looking images with but the right emphasis on your subject's contrast and sharpening. Compared with Standard, Vivid bestows a more glamorous overall impression. Information technology's ideal for situations where you wish to emphasize master colors, such as colorful fashions, urban center streets, fresh fruits and floral arrangements. With Brilliant, you tin adjust sharpening, contrast, effulgence, saturation, and hue (coloration) individually. Quick Conform enables easy, balanced adjustments.
Monochrome
Gives yous monochromatic shadings, such as black-and-white or sepia. You lot can besides select Filter Effects, to create the kind of results you get when shooting with a color filter for black-and-white photographs; and Toning, to adjust the overall tone of images in a way that formerly required working in a darkroom with photographic paper when shooting with picture show. With Monochrome, you can adjust sharpening, contrast, effulgence, Filter Outcome (Y/O/R/ ・Yard), and Toning Saturation individually.
Optional Picture Controls
Portrait and Mural are Optional Picture Controls (pre-installed in select DSLRs) that can be downloaded for installation in the D3X, D3S, D3, D700, D300S and D300 DSLRs. The number of Optional Picture show Controls that can be installed may differ with camera models, so again bank check your manual. Nikon also offers Picture Controls approximating the look achievable from the D2X and D2XS DSLRs; these can be installed and used in select Nikon DSLRs.
Download the optional Film Controls from the Moving picture Controls website.
Portrait
Using Neutral equally its base, Portrait imparts more natural appearing skin, then skin tones are more lifelike, projecting a existent sense of depth—equally if shot with professional person-quality pic—for a clear, authentic finish. With Portrait, y'all can conform sharpening, contrast, brightness, saturation and hue (coloration) individually. Quick Adjust enables easy, balanced adjustment.
Mural
Produces a more noticeable intensity than Standard. Compared with Vivid, Landscape creates more soothing, relaxed colors, effective for any nature scene; for images that take rich gradations and enhanced vibrancy. With Landscape, you can conform sharpening, contrast, brightness, saturation and hue (coloration) individually. Quick Adjust enables easy, balanced adjustment.
Flat
Apartment provides minimal dramatization while preserving the cloth characteristics. Compared with Neutral, the finish shows less contrast and does non wait equally lively as it is. Flat is most ofttimes used when shooting video. When you lot add adjustment to the video afterward shooting, overblown highlights, blocked up shadows, or excessive color saturations rarely occur, thus enabling rich tonality of both brightness and color tones. With the wealth of information from highlight to shadow areas, this way is recommended when you are shooting a scene with post-shoot adjusting in mind.
The Flat Motion-picture show Control was added with the Nikon D810 DSLR and can exist establish in cameras introduced after the D810. To adjust the Apartment Picture Control on images, use Motion-picture show Control Utility two which can exist plant in Nikon Capture NX-D or Nikon ViewNX2 software programs (as of June 26, 2014) or Nikon ViewNX-i software (as of March 2015).
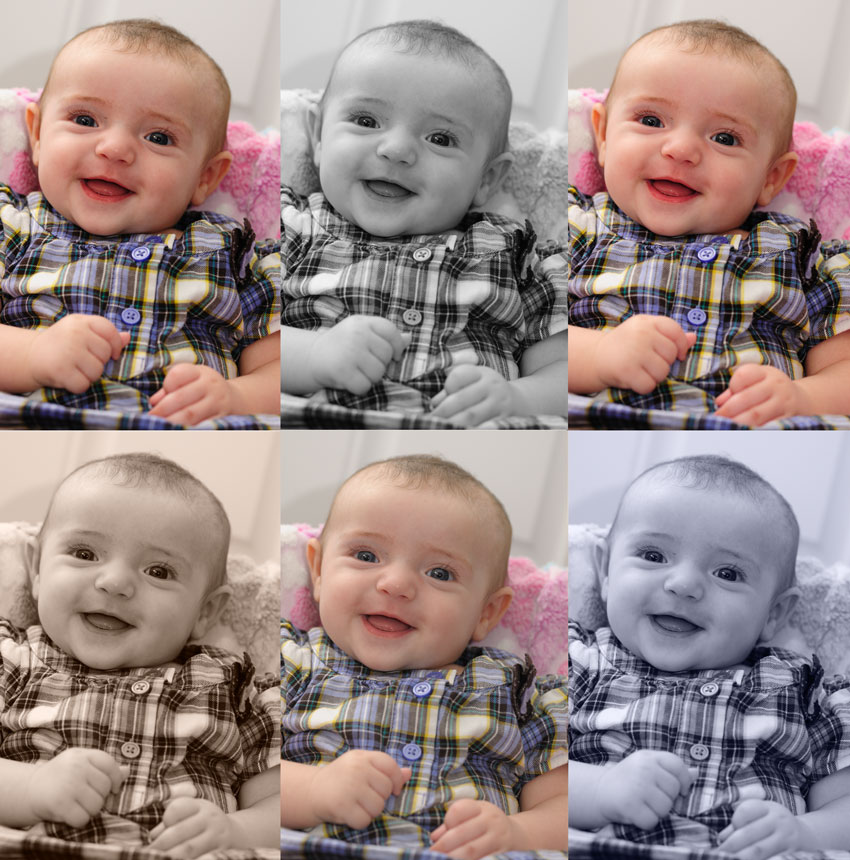
(fifty. to r.) Elevation row: Flick Control: Neutral, Standard, Bright; Lesser row: Portrait, Landscape. In this case, a portrait of a cute baby daughter, the Picture Command was set to Neutral in the camera. Because the Motion picture Controls will provide the same results whether you alter them in-camera or via Nikon View NX2's Picture Control Utility or Nikon Capture NX2, you'll get the same results. For this example we did the work in Nikon Capture NX2. You tin can run across the subtle differences in the pare tone besides as in the babe'south plaid shirt. The colors "pop" more in the Brilliant setting than they practise in Neutral, Standard or Portrait.
© Diane Berkenfeld
(l. to r.) Top row: Picture Control: Neutral, Standard, Vivid; Bottom row: Portrait, Mural. In this example, a portrait of a beautiful infant girl, the Movie Control was set to Neutral in the camera. Because the Picture Controls will provide the aforementioned results whether you alter them in-photographic camera or via Nikon View NX2's Pic Control Utility or Nikon Capture NX2, you lot'll get the aforementioned results. For this example we did the piece of work in Nikon Capture NX2. You tin see the subtle differences in the skin tone too as in the baby'due south plaid shirt. The colors "popular" more than in the Vivid setting than they exercise in Neutral, Standard or Portrait.
Each Flick Control (except Neutral and Monochrome) allows yous to utilise Quick Adapt for adjustments.
Each Pic Control (except Neutral and Monochrome) allows you to utilise Quick Adjust for adjustments.
Quick Conform
Quick Adjust makes information technology piece of cake to achieve well-counterbalanced adjustments. With sharpening, contrast, and saturation, 5 levels of modification (-2 to +5) are applied automatically. Increasing a value on the plus side strengthens the characteristics of each Picture show Control while movement on the minus side lessens the effect. Moreover, later using Quick Adjust, you tin can carry out finer, more than detailed modifications to each item to conform your particular preferences and get the exact results you lot require. Each Movie Control (except Flat, Neutral and Monochrome) allows yous to use Quick Adjust for adjustments.
Sharpening
Enables y'all to alter the strength of your field of study's contours in ten levels, starting from [0] (no sharpening). You can also set the camera to [A] (car), where it makes adjustments automatically to match shooting conditions. The lower the number, the softer your image will be; the higher the number, the more distinct.
Contrast
For fine-tuning the contrast of your images in seven levels, from [-3] to [+3]. You tin also prepare the camera to [A] (auto), where it makes adjustments automatically to suit shooting atmospheric condition. Adjusting toward the minus side provides softer paradigm tones; adjusting toward the plus side results in harder prototype tones. The minus side is suitable for shooting portraits in sunlight or situations where you might exist concerned virtually blown highlights; the plus side is better for situations such as distant scenes shrouded in mist. (Unless Active D-Lighting is set to OFF, the level of Contrast cannot be adapted.)
Clarity
The level of clarity can be adjusted in still photographs only. The lower the number, the softer the image. The higher the value, the clearer the image. While sharpening mainly controls the contours of a bailiwick, clarity can control the subject's clearness while maintaining the gradation of highlight and shadow areas. Clarity is useful when you lot want to make hazy-looking subjects await clear while maintaining the details, or when you want to brand hard-looking subjects wait softer and gentler.
Effulgence
While making adjustments for overall image brightness, you tin can choose from [-1], [0], or [+i] for fifty-fifty richer gradations in either the black or the white areas. Setting to [-1] creates subdued brightness while the gradations of the shadowy areas are intensified; setting to [+i] increases overall brightness while deepening the gradations of the highlighted areas. (Unless Active D-Lighting is fix to OFF, the level of Brightness cannot be adjusted.)
Saturation (other than monochrome)
Lets y'all command the saturation of images in 7 levels, from [-three] to [+3]. You can also gear up the photographic camera to [A] (car), where it makes adjustments automatically to suit shooting conditions. Moving toward the minus side results in a softer degree of brightness; moving toward the plus side provides a deeper brilliance.
Hue (coloration) (other than monochrome)
Allows y'all to accommodate the hue of images in 7 levels, from [-3] to [+3]. In terms of peel tones, the minus side increases reddishness, while the plus side enhances yellow tones.
Filter effects (Y/O/R) monochrome only
This role provides an event similar to shooting black-and-white photographs with a color filter. It emphasizes the contrast of [Xanthous], [Orange], and [Reddish], with dissimilarity strengthening in the order [Y] -> [O] -> [R]. Utilise this Flick Control for landscape shots where you lot wish to soften the effulgence of the heaven for a deeper look.
Filter effects (G) monochrome only
Provides an effect similar to shooting black-and-white photographs with a green filter. Lends a finely composed finish to skin color or lips, for example.
Toning (monochrome only)
Enables you to change colour tones of the overall image, in a manner similar to toning photographic paper. Select from ten colors, including the default [B&West] setting.
Toning saturation (monochrome only)
In improver to [B&W], you can adjust the shading of colors in seven levels.
(50. to r.) Here's the same image of the baby girl, with the (B&Westward) monochrome, Sepia and Cyanotype Picture Controls. Sepia and Cyanotype are both toning options under the Monochrome Picture Command. Other tones are bachelor too.
© Diane Berkenfeld
(l. to r.) Here'south the same paradigm of the infant daughter, with the (B&W) monochrome, Sepia and Cyanotype Picture Controls. Sepia and Cyanotype are both toning options under the Monochrome Picture Command. Other tones are available equally well.
Filigree Brandish
Picture Controls can be displayed as coordinates on a grid, based on the mutual Movie Controls standard, with Dissimilarity every bit the vertical axis and Saturation equally the horizontal centrality*. This enables y'all to visually determine the relationships between your selected Picture Command and other Picture Controls. (*In Monochrome, but Contrast is shown.)
Picture Control Grid: Pressing the [Thumbnail/Playback Zoom] push while making adjustments changes the screen to a grid display, causing the Picture Controls stored in your photographic camera to exist shown as relative Contrast and Saturation coordinates. Unlike the slider display of the Picture Control adjustment screen, the grid brandish shows Contrast and Saturation positions* based on a common Picture Controls standard. With employ, it becomes visually articulate that the Contrast 0 and Saturation 0 settings for Standard are not exactly the aforementioned as those for Vivid, despite the fact that they both appear equally 0 on their corresponding Movie Control adjustment screens. (*In Monochrome, only Dissimilarity is shown.)
The Flick Control System tin can be further enhanced past software; using Nikon ViewNX ii or Capture NX 2 featuring the Motion-picture show Control Utility, and the optional Photographic camera Command Pro 2 that enables remote command of Moving picture Control.
For the D810 DSLR and Nikon cameras introduced after (June 2014), apply ViewNX-i or Capture NX-D software for editing and processing RAW NEF files likewise as bones editing. When working with these programs, Picture Controls are accessed via Picture Control Utility 2, which tin be launched from ViewNX-i or Capture NX-D (which also supports the Flat Pic Command.) Both are free downloads.
Custom Motion-picture show Controls
Custom Picture Controls allow you to create your own epitome way and name them.
Yous can also use Picture Controls created with Picture Control Utility, available via ViewNX 2 software, or with Picture Command Utility 2, which launches from within ViewNX-i or Capture NX-D software; or utilize Picture Controls created on other cameras by importing them to the camera on a retentivity carte du jour and registering them as custom Picture show Controls.
Custom Motion picture Controls can be edited and registered in the camera. You can change their names, delete them, and copy them to a retention bill of fare. You can also freely share files between cameras or photographers using a memory card, also every bit importing custom Movie Controls created with Picture Control Utility and registering them in your camera. Moreover, you can import custom Flick Controls created in your camera to a computer via Film Control Utility, then apply them to images using ViewNX 2 or Capture NX 2 software (and with newer cameras, launched after June 2014, using Film Control Utility ii, which launches from inside ViewNX-i or Capture NX-D).
The number of custom Picture Controls may vary depending upon camera, so check your manual.
The Motion-picture show Control Utility allows yous to brand all the adjustments that y'all can do in-photographic camera with Motion-picture show Controls but in postal service-production on the reckoner. Change from Neutral to Brilliant, Standard to Monochrome, brand minor adjustments, use Quick Arrange or create new Moving picture Controls to use in your camera.
The Picture Control Utility allows yous to make all the adjustments that you tin can do in-camera with Picture Controls merely in post-production on the calculator. Change from Neutral to Vivid, Standard to Monochrome, brand minor adjustments, use Quick Adjust or create new Moving-picture show Controls to employ in your camera.
Master Functions of Picture Control Utility/Picture Command Utility 2
- Direction of custom Picture Controls : For import/export of custom Picture Controls to or from the Pic Control listing and retentivity card, likewise equally for changing the names of custom Movie Controls in the Picture Control list, and deleting them.
- Picture show Command Level Adjustments: For not-Monochrome Flick Controls, allows you lot to adjust the sharpening, contrast, brightness, saturation, and hue (coloration), while checking the effects on a sample paradigm in real time. Monochrome-related Moving-picture show Controls permits yous to arrange the sharpening, contrast, and effulgence and to set Filter Furnishings and Toning. Picture Controls you've adjusted can be overwritten or saved every bit new ones; in either case the Picture Control function in the original software volition automatically reverberate the changes.
- Custom Tone Curves: Rather than making individual adjustments to Contrast and Brightness, you can utilize custom tone curves to make adjustments to both at the same time. Custom tone curves created with Picture Command Utility can be read from files and saved.
Nikon View NX 2
The Picture Controls for [Paradigm Adjustment] allow y'all to apply Picture Controls to whatsoever RAW image (NEF) file.
Nikon Capture NX 2
In the Edit List, Moving-picture show Controls can be applied to any RAW prototype (NEF) file using Develop -> Camera Settings -> Picture Command. With the exception of Custom Tone Curves, you can also make adjustments to custom Picture Controls in the aforementioned mode as with Picture Command Utility. Motion picture Controls can even be applied to RAW image (NEF) files taken on earlier models, such every bit the D2XS.
Camera Control Pro 2
When a Nikon DSLR photographic camera that supports Movie Controls is connected to a computer via USB, the Flick Controls can be selected and set in the Processing Console of the Camera Control Pro panel. Pressing the [Edit] push button causes Adjustment Dialog to appear, allowing you to modify the currently selected Picture Command. Pressing the [Custom Movie Control] button causes Custom Picture Control Dialog to announced, allowing you to change the names of the camera's custom Picture Controls or delete them.
ViewNX-i
Access the Picture Control Utility ii from ViewNX-i from the File menu, and select Launch Motion-picture show Control Utility. You lot can alter the Picture Control that you lot had selected in-photographic camera on NEF (RAW) files using Motion-picture show Control Utility 2.
Capture NX-D
When using Capture NX-D software, go to the Tool menu and select Launch Picture Control Utility 2. Y'all can change the Flick Control that was selected in-camera on NEF (RAW) files using Picture Control Utility 2.
This Commodity Goes Great With These Products
Source: https://www.nikonusa.com/en/learn-and-explore/a/tips-and-techniques/picture-controls-step-by-step.html