Main Masses of the Body Drawing
Understanding the structure of the human trunk is fundamental to improving your character illustrations! With this illustrated tutorial by Eridey, learn more about bones, muscles and detect how the unlike parts of the body are connected to each other.
The key to improving is to do our best and put our heart into what we do. Anatomy is not an easy bailiwick, merely I hope that this article can be a quick guide for you and get you in the mood to keep learning. Let'due south beginning with the building blocks of the human effigy:
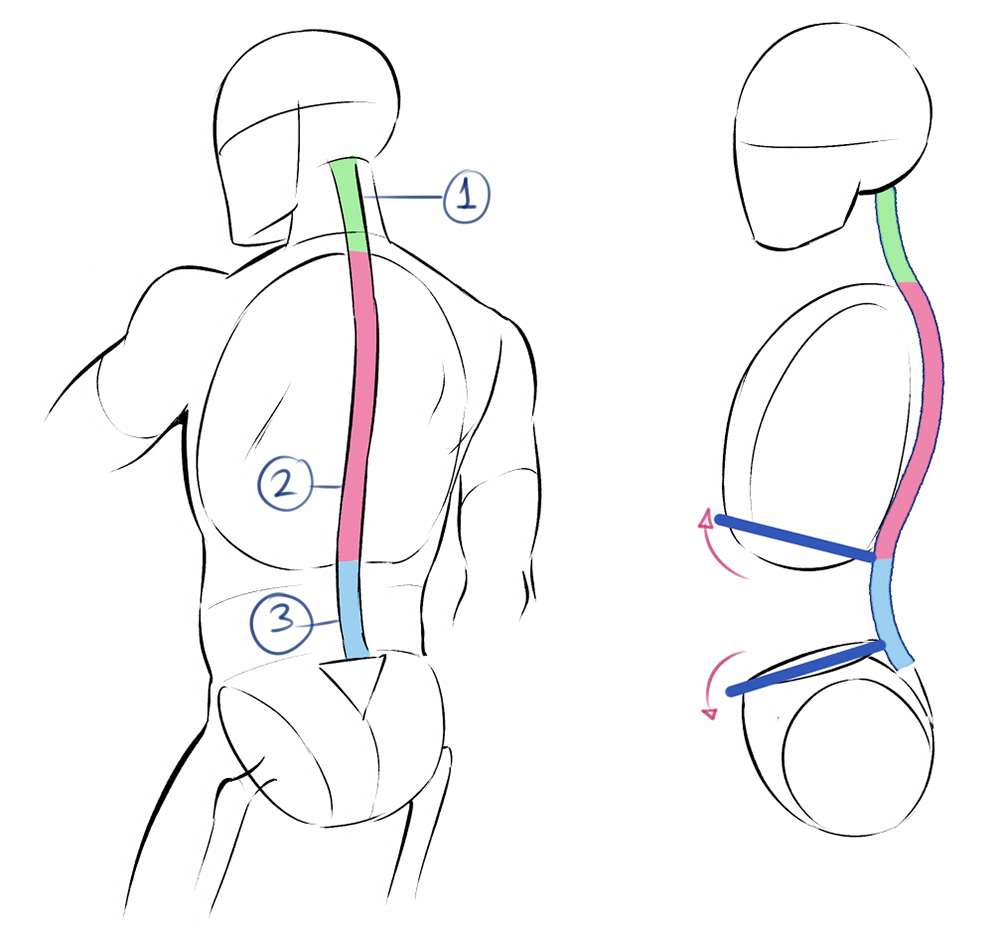
The spine is the body'due south support, besides allowing motion in the torso. Its vertical shape differentiates humans from other species. It is non a directly line, but a curve. Its shape makes the pelvis and the rib muzzle tilt slightly. Allow's split up it up into 3 parts to come across it better:
- Cervical spine — supports and provides mobility to the head
- Dorsal or thoracic spine — supports the ribs.
- Lumbar spine — a little before the pelvis, connected to the sacrum.
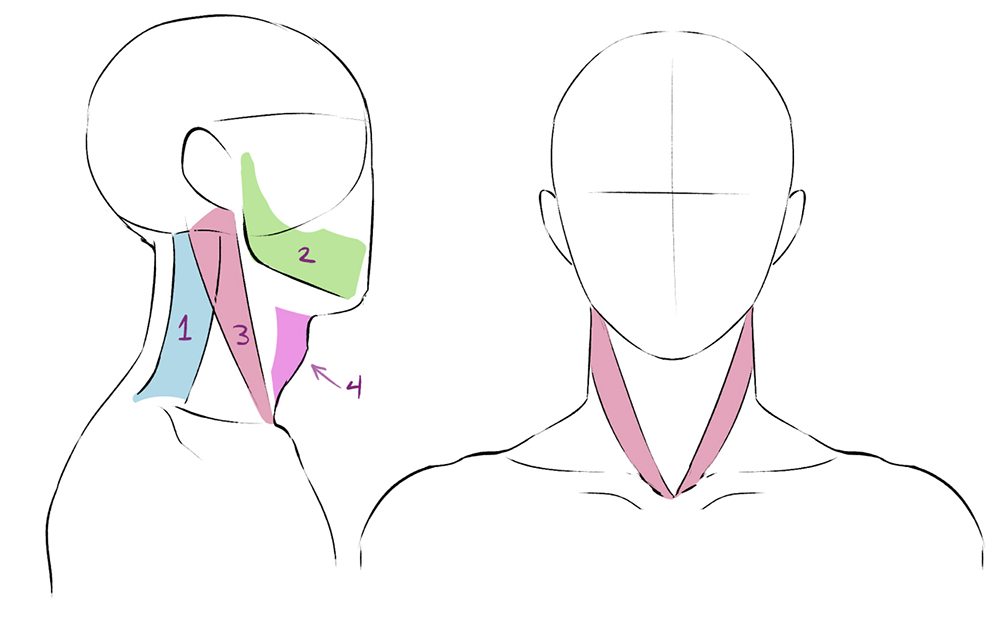
In the neck, the cervical spine (one) is located just backside the jaw (2). There are a variety of muscles that operate the movement of the head. The well-nigh visible one has a very, very long name (sternocleidomastoid!), but y'all can easily recognize it by its V shape, parting from the ear to the center of the clavicles (iii). In the middle of these muscles is the Adam'due south apple, which is more prominent in men (4).
The dorsal spine is the function that connects to the arms. You can depict information technology in many ways, I like to requite it an ovoid shape that resembles the shape of the ribs (i).
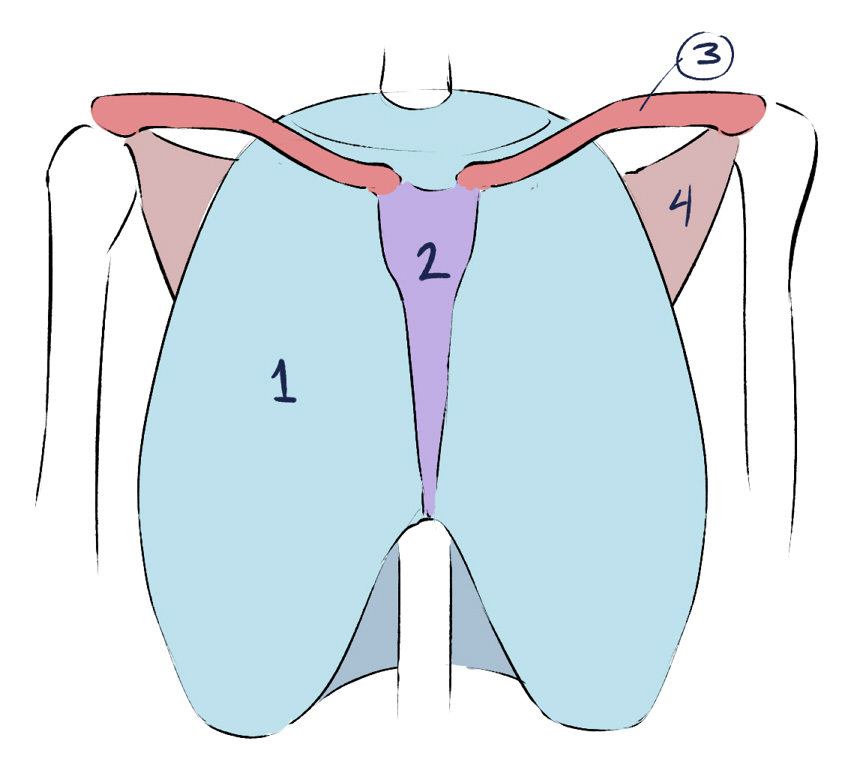
The sternum (two) closes this construction in the front end, creating, with the spine, an imaginary line that divides the trunk into ii. Apply them equally a guide!
The clavicles (three) are similar a bicycle handlebar, yous tin can call back of them as a shoulder support. Every fourth dimension the artillery move, they will change direction.
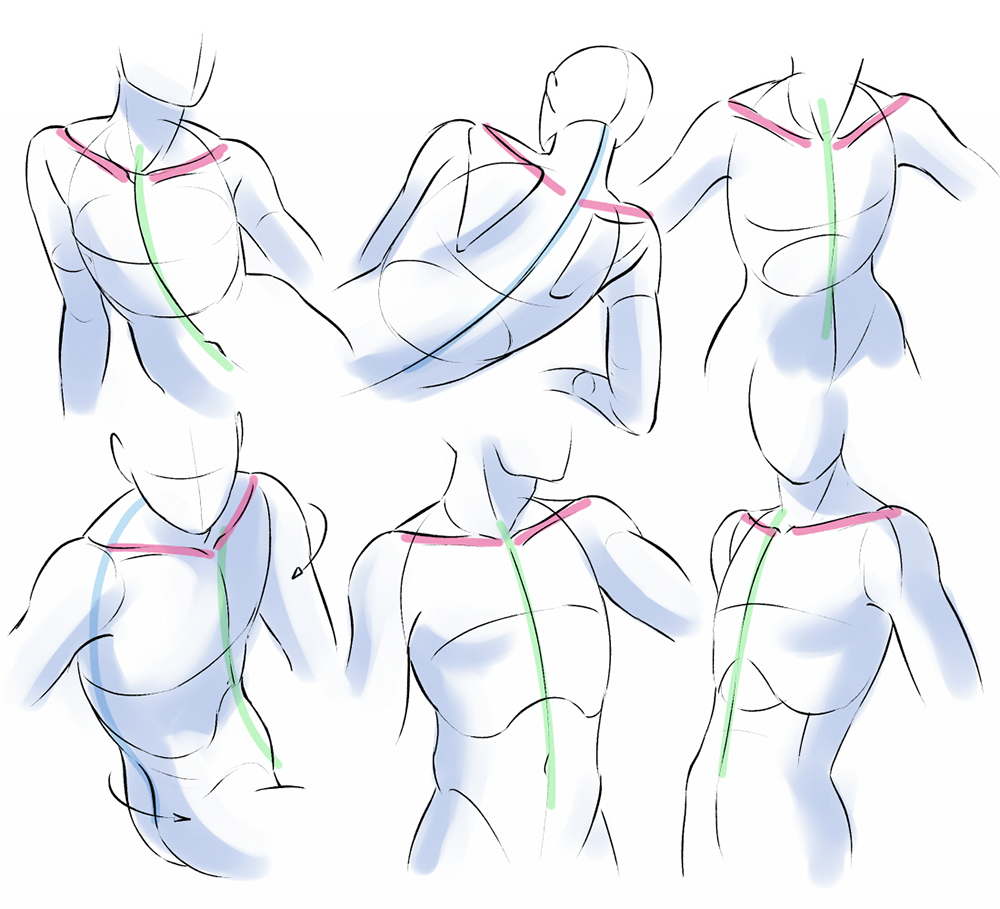
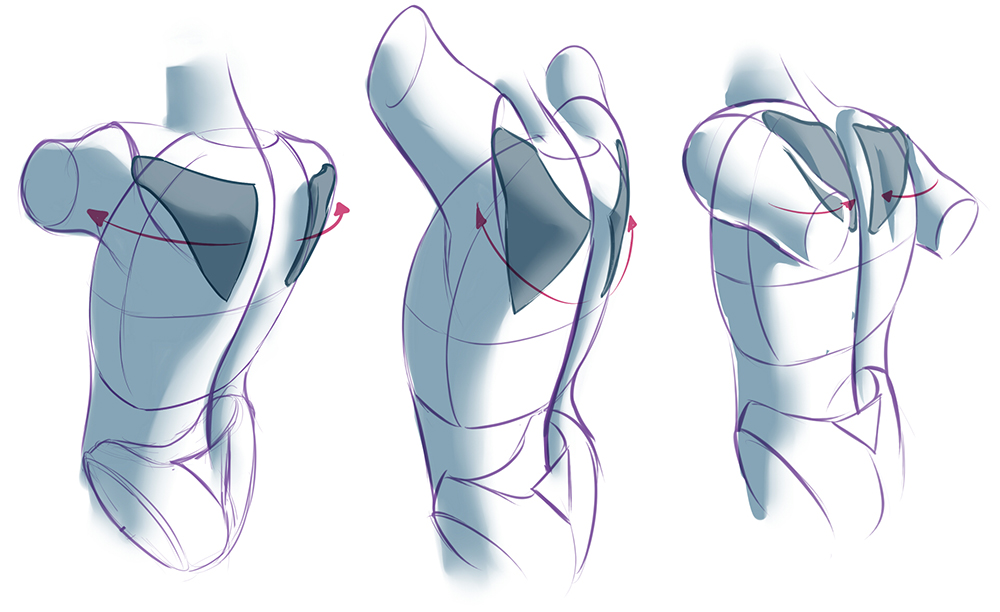
In the back, you will observe the scapulae or shoulder blades. They are triangle shaped and help move the artillery. The shape of the back changes post-obit the movements of these bones.
The pelvis is located at the end of the body, continued to the lumbar spine from the sacrum (1). On both sides y'all can run across the ilium (2); and in the forepart, the pubis (3).
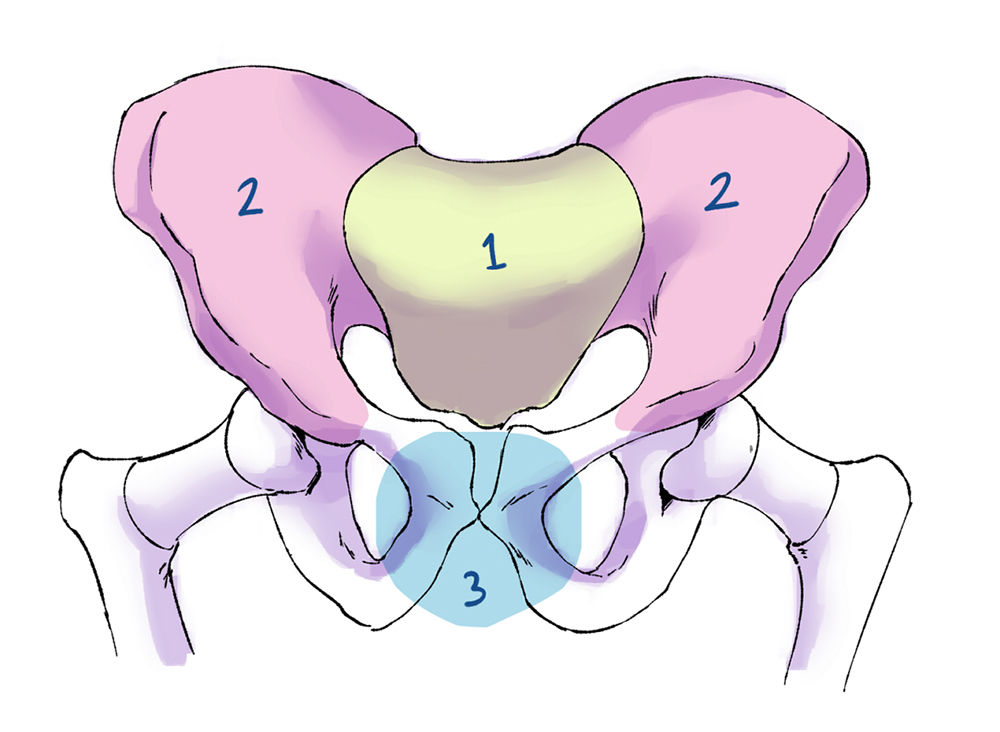
Equally these are somewhat irregular bones, I like to simplify them by drawing a pair of discs for the ilium, and the sacrum as an inverted triangle.
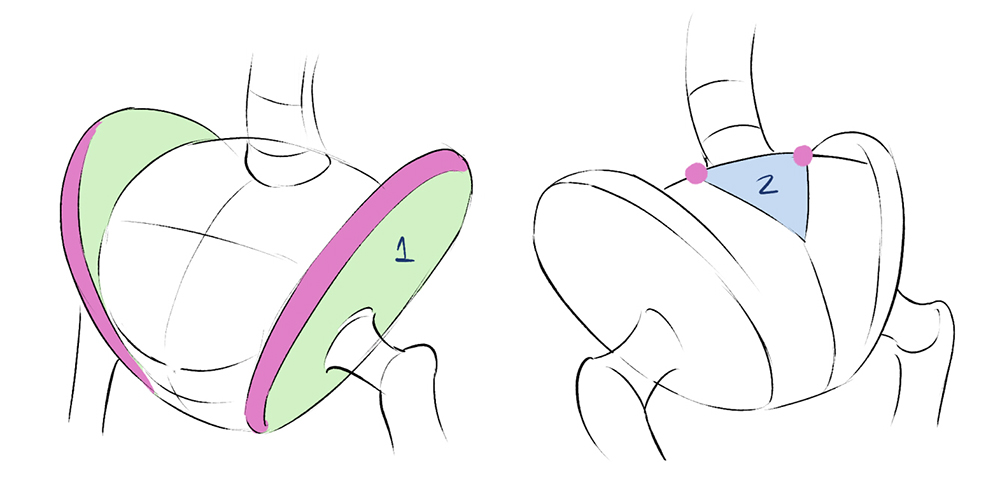
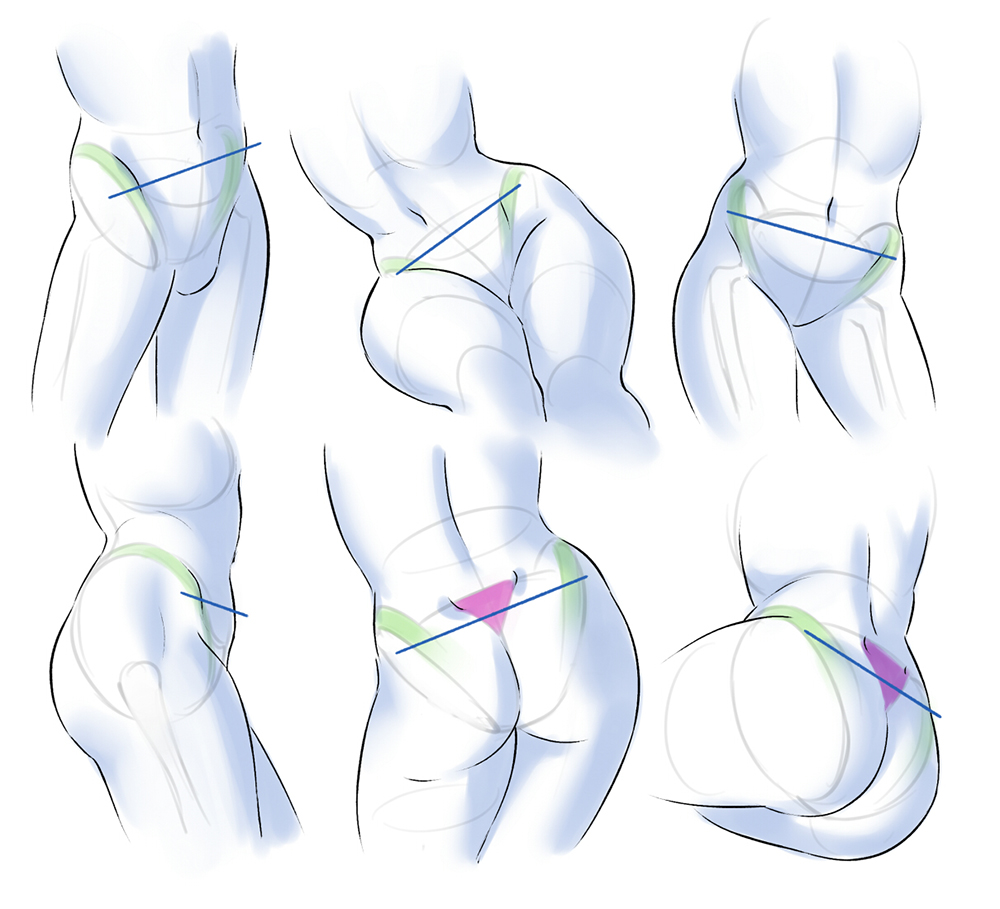
The ilium (i) will guide you to describe the angles of the hip. On the back, these two dimples at the end of the spine, before reaching the buttocks, will help the states identify the sacrum (ii).
Notation that female hips are by and large wider than male hips — ane of the main differences.
Limbs
Limbs can move in many ways, but knowing their limitations will salvage us from drawing unrealistic poses (or os-breaking poses, ouch!).
Arms:
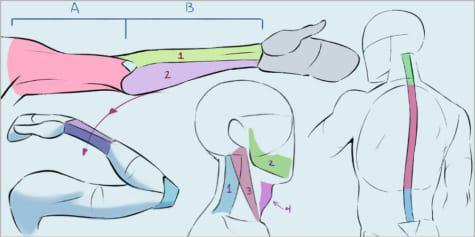
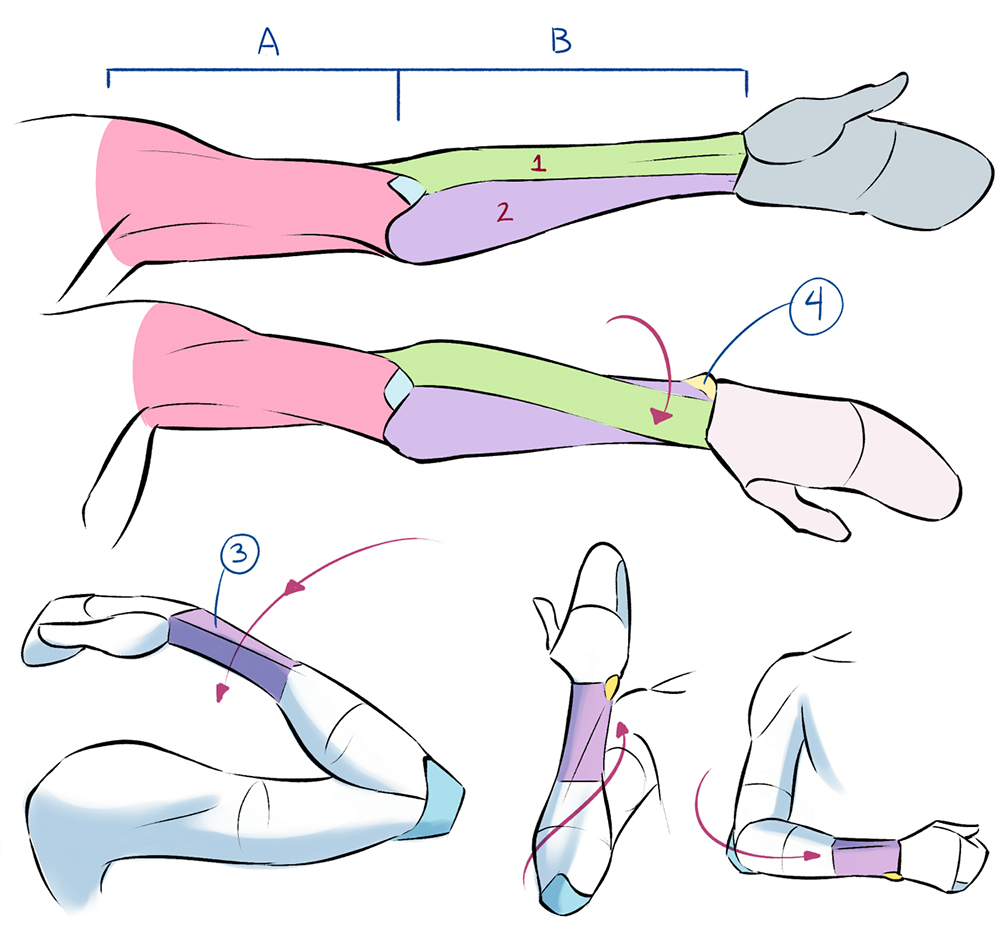
In the upper part of the arm (A) there is the humerus, a long and strong bone that connects to the elbow and articulates the forearm (B).
In the forearm you volition find the radius (1) and the ulna (2). These bones cross to allow the rotation of the wrist. Some artists draw part of the forearm every bit a box to ascertain its volume (3).
Tin you see a tiny lump only behind your wrist? (4) It is part of the ulna. Y'all can use it as a reference betoken to locate the orientation of the arm.
Legs:
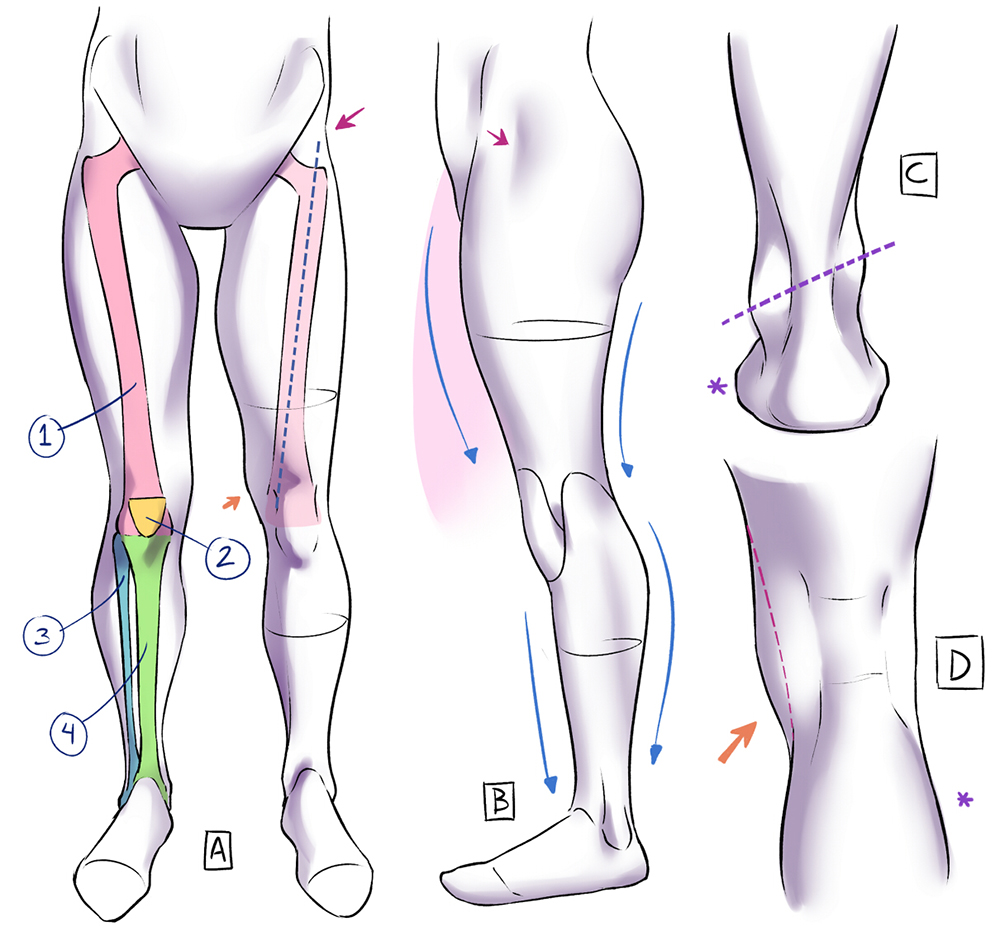
In Fig. A nosotros have the leg basic:
The femur (1) in the thigh; the articulatio genus (2) in the middle of the leg; the fibula (3) and the tibia (four) in the dogie expanse.
The legs should back up the torso and requite it the balance it needs, simply there is a detail that sometimes escapes usa: the legs do not have completely vertical line. In order to achieve balance, at that place must be rhythm. Notice the slight inclination in the femur from the hip to the knee, and the curves (fig. B) that create the profile of the leg (side view).
Other interesting details about the leg:
Betwixt the hip bone and the femur, at that place is a space that can exist seen every bit an indentation in the skin, mainly in men who have less muscle mass in that area.
In figure C, we take the ankle. Its bones are placed at different heights, with the fibula on the outer side (*) being lower.
Effigy D is a dorsum view of the knee. On the outer side (*) the muscles do not generate too much change in the profile, merely on the inner side a small lump is created (I accept likewise pointed this out in figure A).
Proportions
According to some bookish standards, 7 or 8 heads is the ideal height of an adult. However, each person has different proportions co-ordinate to their concrete characteristics. If you compare people of different heights you will notice that individually they maintain proportions according to their own trunk.
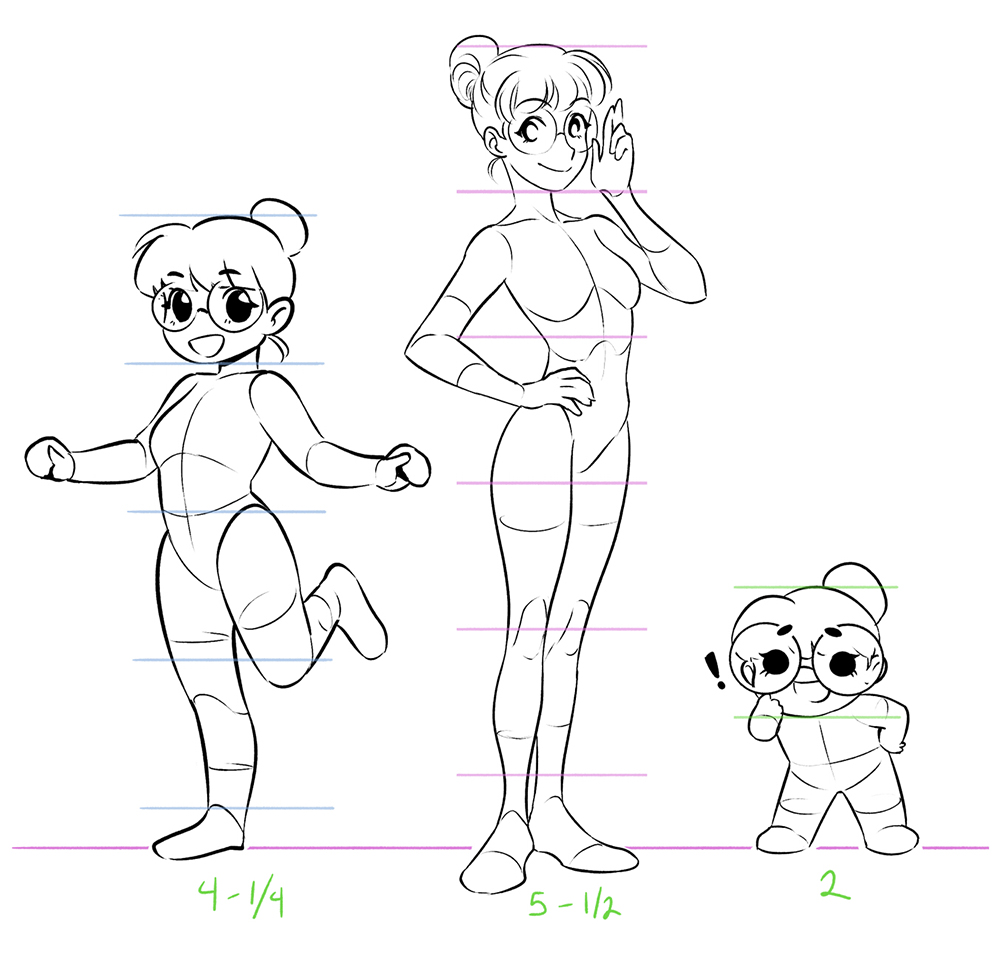
To evidence this, let us look at the following example: two adults, a man and a adult female. Although the female figure is shorter, her body is divided into seven heads (which fits inside the standard) and the male figure is simply a tertiary of a head taller
In the example I have besides included the effigy of a child. Take into business relationship that, at early ages, the body has not developed completely, and then their measures are a little undefined. This 1 is well-nigh 5 heads high.

Aside from this, artists practise change their characters' proportions totally out of these "ideal" ones, to emphasize their unique characteristics or to heighten their drawing styles. (Just this is not an excuse to ignore the fundamentals!)
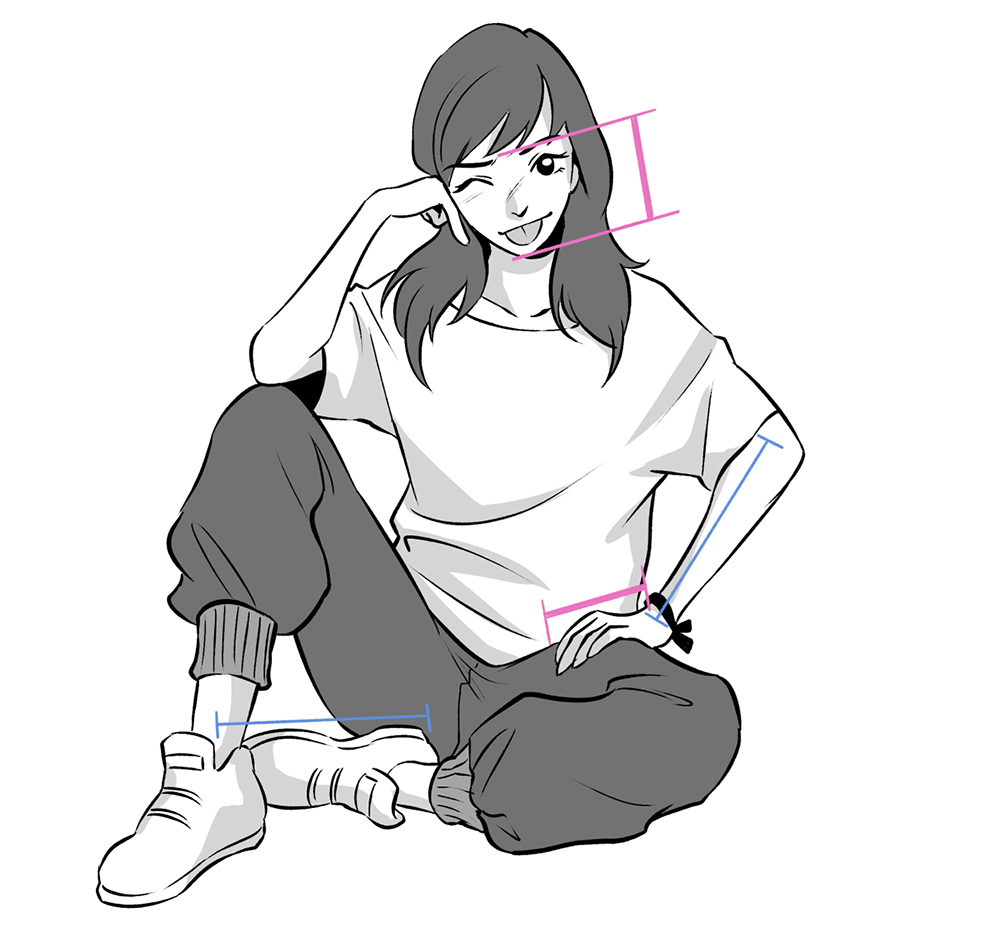
A trick! I like comparing elements of the same length, just to make sure that everything is well proportioned as I draw. For example, the hands are about the size of the face; the feet are as long equally the forearm.
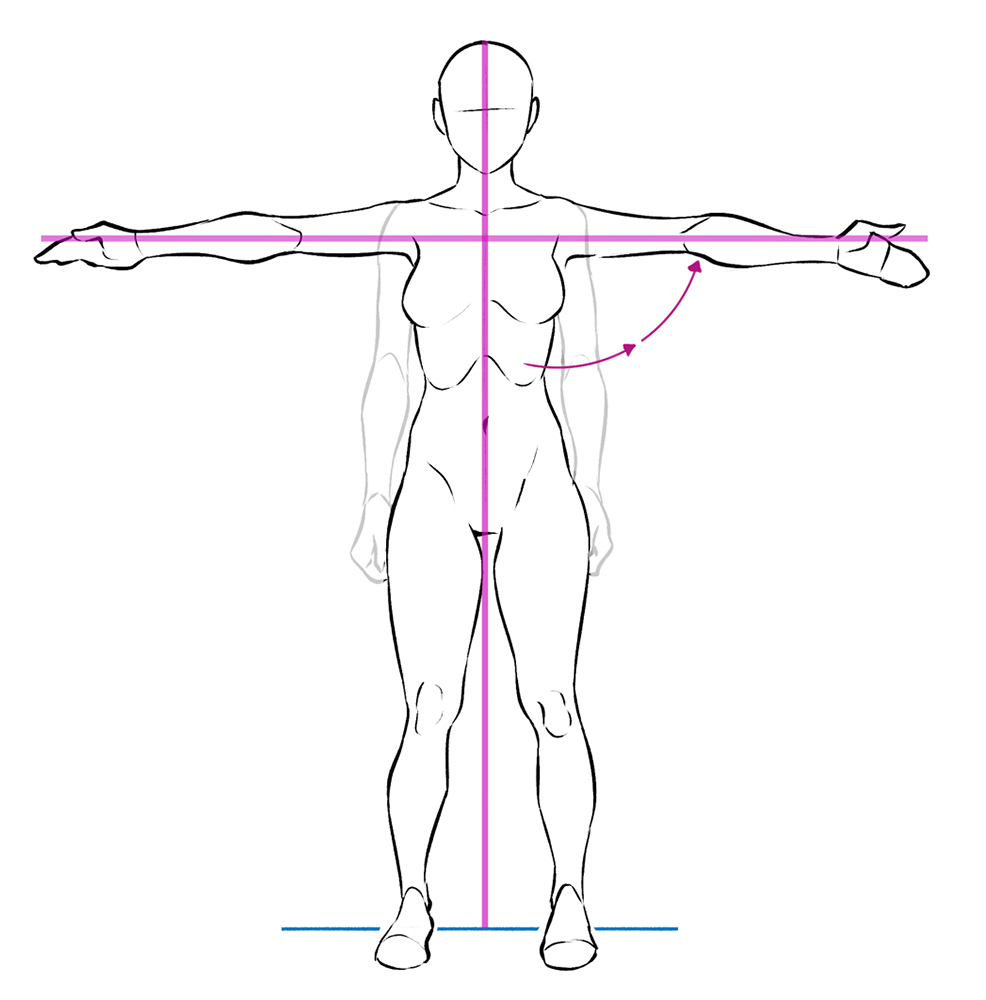
Another piece of data that I find fascinating is the fact that, if y'all extend your artillery, they are side to side the aforementioned length equally your height!
Finally, iv points which will assist u.s. to get better at drawing solar day by twenty-four hours.
- Ascertainment: Study how people walk, their poses, the different types of bodies… Create a reference gallery in your mind and, if possible, take pictures!
- Think in 3D: To sympathise a figure/shape, the best thing is to clarify it from dissimilar perspectives.
- Research: Read about body parts, bones, muscles, functions, etc. From an artist'southward point of view is fine, y'all do not need to become a physician! Nosotros are interested in those beefcake parts which bear on the shapes and movements of the trunk.
- Draw, describe, draw! Practice drawing the whole figure and detailed studies of some particularly hard parts.
Cheers very much for reading!
If you similar, you can check out my social networks and my portfolio to see some of my work.
Bring Energy and Life to Your Poses!
Source: https://www.clipstudio.net/how-to-draw/archives/161109